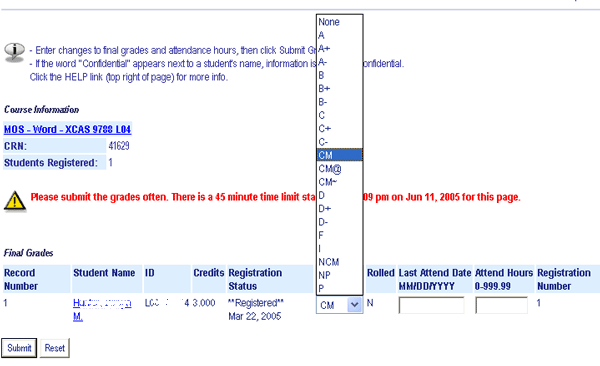
Select Grade - For each student, click the drop-down arrow in the Grades column and choose the applicable grade from the list.
Click here for a list of Grade Definitions.

Grades can be entered individually. You are not required to enter grades for the entire class at the same time. You can change the grades for students on this screen until the grades are administratively rolled into the permanent record, which will happen each night during the grading period.
NOTE: Do not leave any grades blank - you must enter a grade for every student.
Last Date Attended - if the grade is F or NC, type the Last Date Attended in this format: MM/DD/YYYY.
Attend hours - ignore this field unless you have been instructed by your department to include this information.
NOTE: If you want to confirm that the grades were saved (prior to submitting them) just exit/reopen or refresh the Final Grades worksheet for the class. If the grades are still there, then they were saved to the server.
Submit - after you enter grades and other appropriate information, clicking the Submit button at the bottom of the screen saves and submits your grades, even when an alert message (indicated by a yellow triangle or circle) is displayed.
NOTE: When you submit the grades, ignore any message that a student has not withdrawn, which is connected with the Last Date Attended field.
Reset - do not click the Reset button at the bottom of the worksheet unless you want to empty ALL the grades and start with a blank worksheet. If you reset your worksheet by mistake, exit the worksheet without submitting.
